Many swimmers find more enjoyment in a warm pool than a cold pool. This can be particularly true for kids, who sometimes prefer the pool temperature to feel more like bath water.
With us living in Michigan, it can be challenging to keep the water warm enough to prevent kids from shivering in their suits. It was particularly difficult in keeping the water temperature swimmable in the early and latter months of the swim season.
After several years of battling the pool temperature, we decided to take some long-needed action.
A traditional gas or electric heater was not an option for us, as we knew how pricey the monthly utility bill can get. Our pool pump already adds close to $100 per month to our electric bill, in which a traditional heater could add several times that cost each month!
We decided our best course of action was to harness the power of the sun in order to heat the pool.
The first step we took was to purchase a solar blanket. We found that the solar blanket worked great in preventing evaporation and retaining most of the heat that was gained during the daytime hours.
We relied solely on the solar blanket to help keep the pool warmer for several years before deciding we wanted to heat the pool even quicker. That’s when we decided to take things up a notch and add a solar heater for the pool.
We had spent quite a bit of time researching various methods of solar heating the pool, including commercial panels, domes, glazed collectors, and DIY panels. All of the methods have their own distinct pros and cons, but we found that a homemade solar heater was the most practical for our pool.
You’ve probably seen DIY solar heaters for the pool that are essentially a black garden hose connected to a small recirculation pump. Those may be fine for very small above-ground pools, but they’re unlikely to provide a noticeable temperature increase to a larger pool.
The final result of our homemade solar heater was about ½ a mile of tubing on our roof wrapped into twelve coils. Our DIY heater has been running strong for 7+ years (since 2015) and has made a noticeable difference in our pool temperature throughout the swim seasons.
This article will provide in-depth details of making and using a homemade solar heater for the pool. We’ll include real-life data that will show you how well this DIY solar heater works, to help you decide whether it’s worth pursuing for your pool.
Reasons to Make a Homemade Solar Heater for the Pool
When we decided to go down the path of solar heating for our pool, it left us with a decision to make: Should we buy a commercial kit or should we go the DIY route?
While commercial solar collectors are recognized as the most efficient, we ultimately chose to make our own homemade solar heater for several reasons:
Uncertainty
The primary reason we went down the path of making a homemade solar heater is that we had uncertainty as to whether our property layout would serve well in capturing the sun’s energy.
We do not have yard space to mount panels on a rack, meaning they’d need to go on our roof.
The peak of our roof runs north-south, in which the panels would have to be facing either east or west. We knew that the best location is south-facing, which was not an option for us.
By creating our own solar heater, we figured if the orientation resulted in an ineffective heater, it’d be less money wasted than a larger investment on commercial solar panels.
Cost-Savings
We’re always looking to save money when practical, in which the initial cost of commercial panels was quite off-putting for us.
The average cost for a commercial solar heater can run anywhere from $3,000 to $9,000 depending on various factors –size, type of collectors, installation difficulty, etc. Alternatively, kits are available online for self-installation, which would save some cost.
After pricing out materials for our homemade solar heater, we found that we could complete it for about $1,000 in material. This price did not include the cost of an automated controller, but is still a nice savings compared to commercial kits.
Creativity of Design
Much of the fun in our solar heater project was the upfront design of the system, and ability to be creative with it.
By creating a homemade solar heater, it allowed for a limitless potential as we considered various layouts of the collectors. Some of our considerations included:
- How large do we want each collector to be?
- Do we want them to be arranged in parallel, series or a combination of both?
- Do we want a means to isolate each individual panel for maintenance if the need arises?
Ultimately, we knew there’d be satisfaction in creating our own heater simply using everyday materials from our local hardware store.
Important Considerations for Our Homemade Solar Heater
Before even trying to design the solar heater, it’s important to review the lay of the land. This is a key step regardless of whether it’s a commercial solar heater or a DIY solar heater.
Here’s a quick rundown of our site along with considerations to take when creating your homemade heater:
Pool Size
The industry recommendation is to install solar collectors that make up at least 50% of your pool’s surface area. This is often a good starting point in determining how many solar panels are needed to heat the pool.
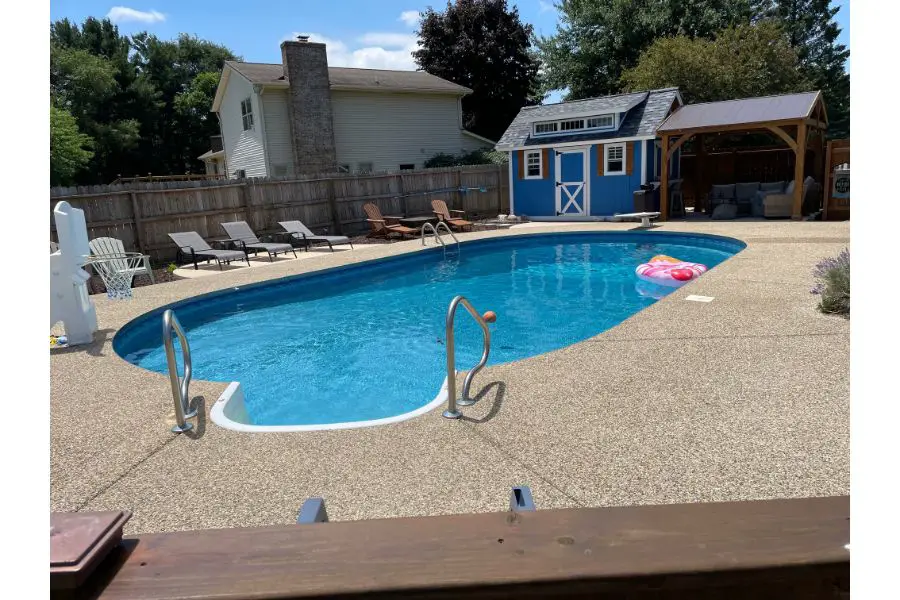
Our in-ground pool is an 18’ x 36’ oval shape, with an average depth of 4.5’. The approximate surface area of the pool is 600 square feet.
In our case, this would mean 300 square feet of solar coverage is recommended. (SPOILER: We ended up well under this coverage, but our heater still works!)
Ground or Roof
When it comes to mounting the solar panels, the two most common locations are either roof-mounted or rack-mounted on the ground. Roofs often provide the largest and most unobstructed space for solar panels making it the more common location.
If mounting on the roof, you’ll want to assess the condition of the roof to ensure it still has plenty of life yet. Otherwise, you may be uninstalling the solar panels before long in order to replace the roof.
Our property is fairly small with no space for a ground-mounted system. Therefore, we had no choice but to mount on our second story roof.
The available section of our roof has an area of approximately 9.8’ by 37’, or about 350 square feet. The shingles on our roof were about 15 years old at the time of installing the solar panels, but were in good condition with no signs of leakage.
Orientation
South-facing panels provide the best solar gains in the northern hemisphere. East and west directions are also suitable for solar collection, but may experience up to 20% less efficiency than due south.
Based on the size and configuration, the east-side of our roof was the only option for our panels.
Angle of the Panels
The pitch of the roof or the ground-mount can affect the efficiency of the solar panels. In general, an angle of less than 45° is recommended in order to best capture the solar rays.
For panels facing east or west, if the pitch is less than 30° their efficiency improves. If east or west-facing panels are flat enough their efficiency may become a bit more similar to that of south-facing panels.
Our roof has a 4/12 pitch, which equates to an angle of about 18°. The flatness of our roof helps offset some of the efficiency loss relative to south-facing panels.
Sun Exposure
Although obvious, it’s important that the solar panels receive direct sunlight in order to heat the water.
Any time shadows from nearby objects or clouds obstruct sunlight to the panels, the heating effectiveness will be reduced. This is often why roofs are commonly chosen for the solar panels as there are less objects casting shadows up there.
Thanks to the shallow pitch of our roof, our east-facing panels receive sunlight for 8+ hours a day even in the late afternoon as the sun is to our west.
Pump Flow
While temperature gain across the solar heater is very important, the flow rate through the heater is equally important. A high temperature gain with a low flow rate is generally not going to be as efficient as a lower temperature gain with a higher flow rate.
It’s also important that your pump can provide adequate flow through the solar panels in order to maintain turnover rate of your pool.
Flow rate through the solar heater will depend on how far away your panels are from the pump, along with size and configuration of the panels.
Often 3 to 5 gpm (gallons per minute) is recommended for each commercial panel, but the ideal flow rate may vary on their exact design.
For those considering any type of solar heating for the pool, it’s recommended that you understand your pump’s capability. To go through the effort of installing a solar heater only to find that the pump cannot provide adequate flow would be disappointing.
It’s worth evaluating the current performance of your pump and estimating the Total Dynamic Head that will be added through solar heating. A pump performance curve can help understand whether it will be capable of providing adequate flow through the solar panels.
In some instances, a booster pump may be needed to achieve enough flow through the solar panels. While running a booster pump is still tons cheaper than running a gas or electric heater, it will cut into some of the ‘free’ benefit of solar heating.
Our pool pump is a 1 hp Pentair Sta-Rite Duraglas, that’s about 50 linear feet away from where we decided to mount the solar collectors on the roof –30 feet horizontal and 20 feet vertical.
We did not perform extensive design calculations of the TDH before installing our system. At worst, we figured we could always add a booster pump if needed. Fortunately, our pump ended up being capable of providing adequate flow through our heater.
Our Homemade Solar Heater
Now that we’ve reviewed initial considerations, let’s look at the details of our homemade solar heater.
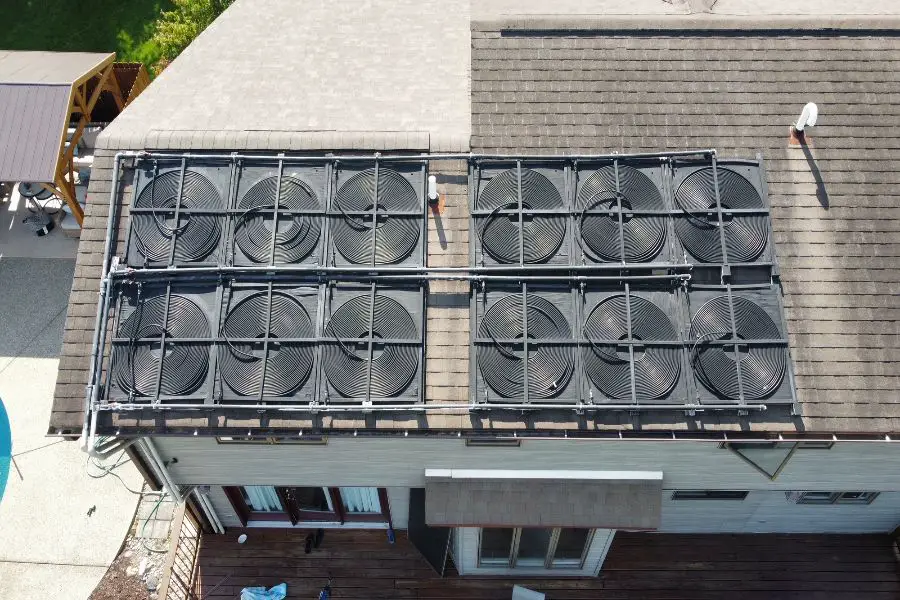
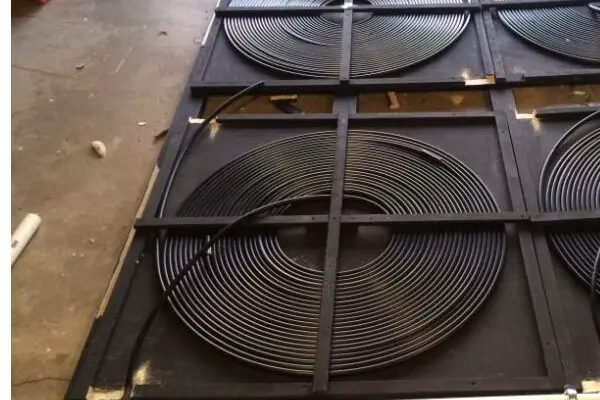
Our homemade collectors are made up of ½” black polyethylene (poly) tubing sitting on top of a 4’ x 4’ black panel. Each panel was able to fit about 220 feet of the poly tubing in a tightly coiled pattern.
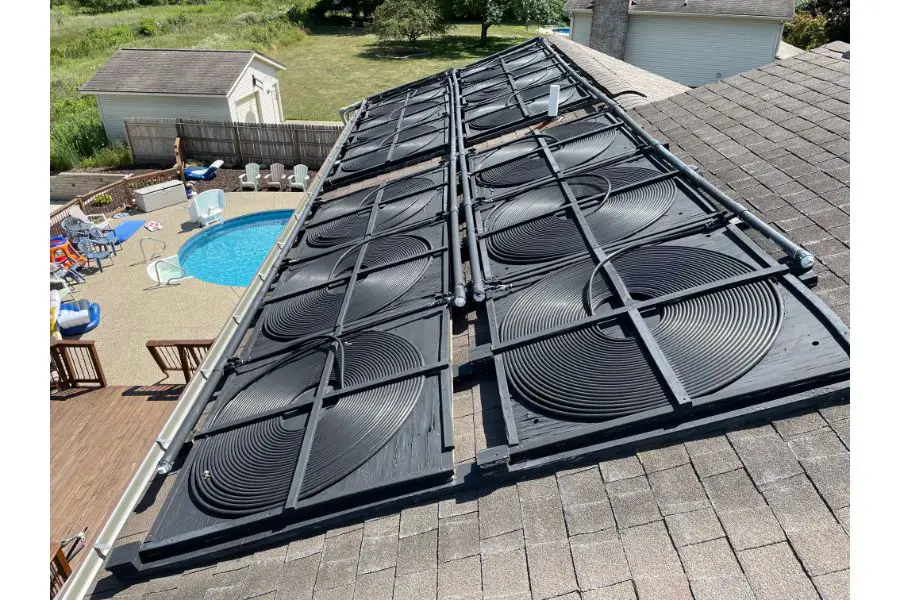
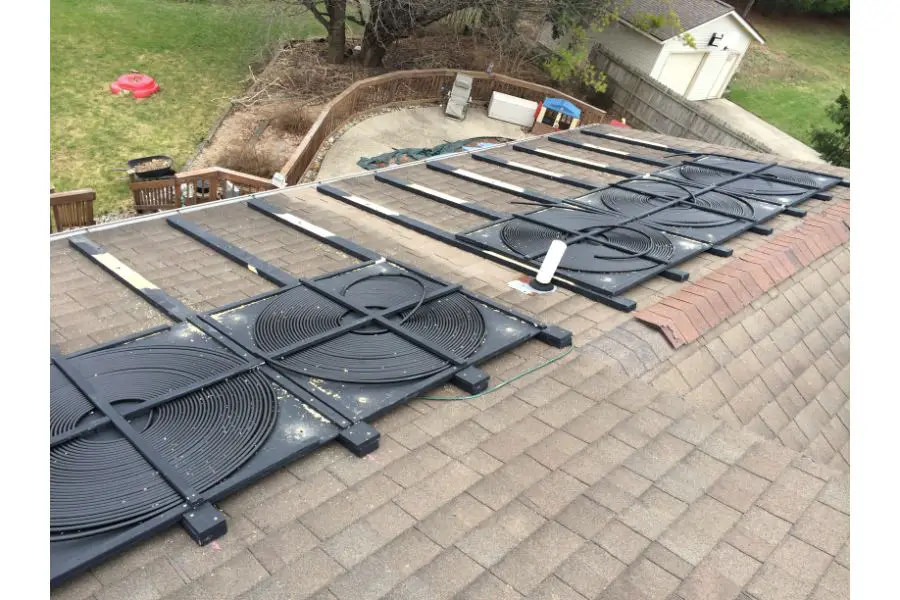
We built 12 of the homemade panels, giving us a total of about 2,600 linear feet (½ mile) of tubing on our roof. The panels occupy about 60% of our available roof space, in which we kept the option open for addition of more panels in the future.
The shape of each coil is approximately a 4’ diameter circle with an empty space of about 12” in the center. This means each panel has approximately 12 square feet of surface area with a combined surface area of 145 square feet across all 12 panels.
The solar panel design was inspired by a homemade heater we had run across in our research that had achieved promising results. So, we figured it’d be a great starting point for ours!
Our system has 120’ of header piping that carries water to and from the panels. The headers provide another 25 square feet of surface area for our solar heater.
The combined 170 square feet of surface area between the panels and header is still significantly less than the industry recommended of 300 square feet for a pool of our size. However, we’ll look at real data later on in this article to help gauge effectiveness.
The panels are attached to roof trusses using galvanized lag screws. Care was taken in sealing the roof penetrations in order to prevent leaks into our house.
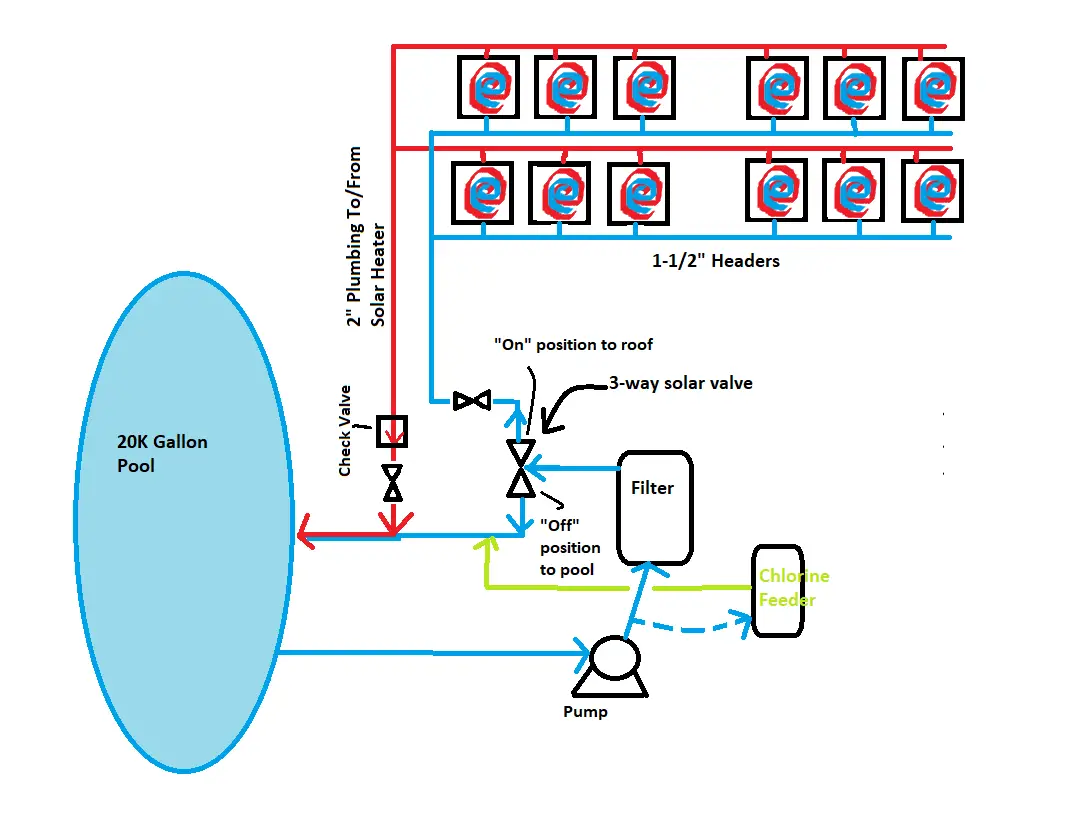
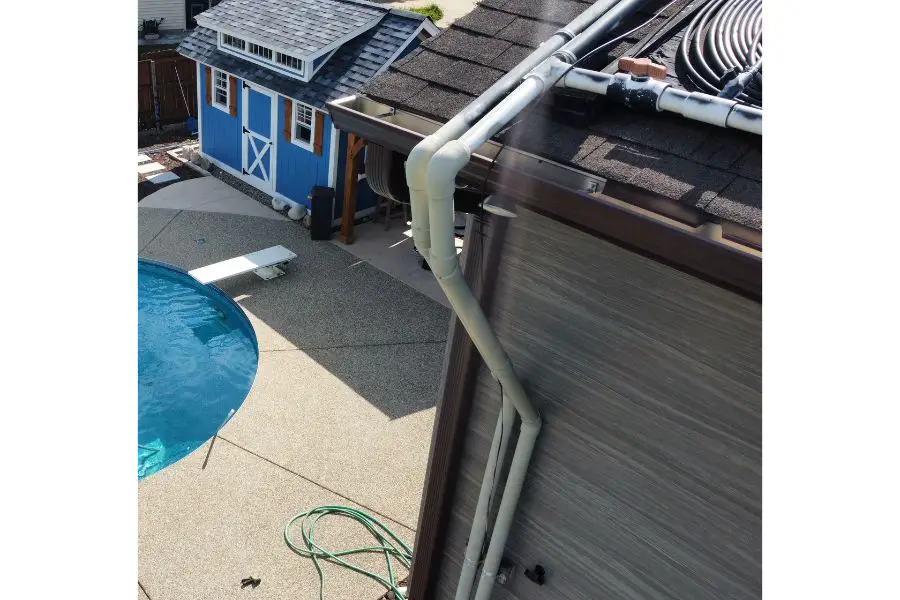
We utilized 2” schedule 40 PVC piping to run from our pump pad up to the roof before reducing to 1.5” headers that serve the panels. The 2” piping provides much less friction loss than 1.5” piping, in which we wanted to maximize our flow rate and pump efficiency.
We ran the 2” supply and return piping from the pump underneath our deck within the joist bays. The vertical pipes to the roof were run up the east wall of our house to reach the 1.5” headers.
The panels are arranged in parallel, meaning that water is supplied to all of the panels simultaneously. This provides maximum heat absorption and flow performance while minimizing strain on the pump that can occur if running panels in series.
Water enters the panels at the bottom and moves through the coil before exiting at the top of the panel.
We have valves at the inlet and outlet to each panel, which allow us to isolate individual panels in case maintenance is needed.
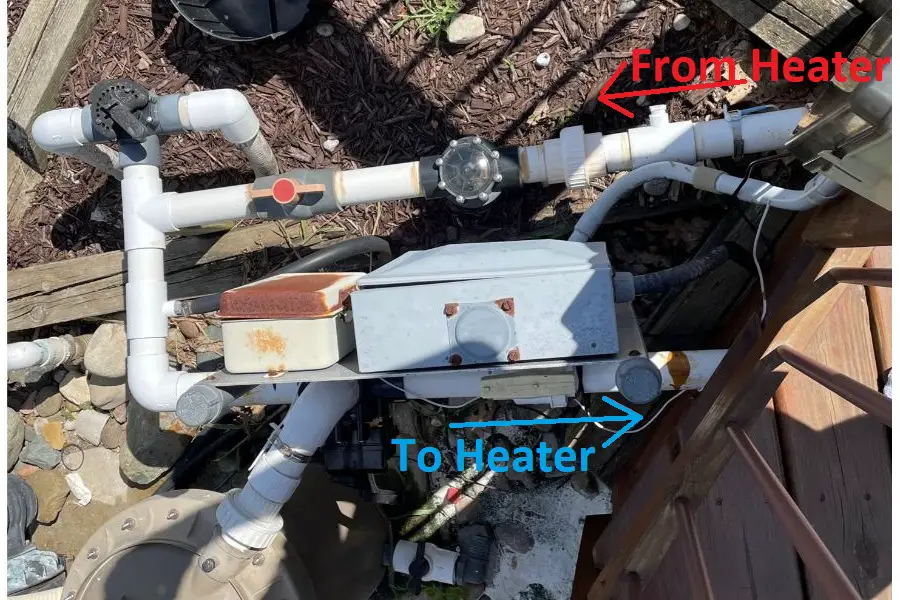
A 3-way valve at the outlet of the filter allows us to send water to the solar heater when desired. The valve is useful in being able to balance the flow, such that a portion of water goes to the pool and a portion goes to the solar panels.
We installed a solar controller to automate the process of sending water to the solar heater. The controller monitors temperature at both the roof and the pool to determine if conditions are right for solar heating, upon which it opens the 3-way valve.
Cautionary Note About Our Solar Heater Design
Contrary to industry guidance, we do not have a vacuum breaker on our system.
The purpose of a vacuum breaker is to prevent vacuum that may be caused when water is pulled down from 2-stories after the system has shut off. In such cases, vacuum has potential to collapse the heater piping and tubing.
The vacuum breaker is often installed at the highest point of the solar heater panel header.
Fortunately for us, we’ve not had any pipes collapse –this may just be luck or might be due to configuration of our system. You may want to consider a vacuum breaker on your system, or at least be prepared to add one later on if needed.
How to Build the Homemade Solar Heater
It took me approximately three weekends along with some evening nights to build and install the solar heater. We spent much more time researching and designing the system than it took to actually build it.
Below are the steps to build our homemade solar heater. These steps are intended to simply serve as a guide for how I built our particular configuration –you will likely need to customize yours to best fit your installation site.
Materials & Costs (circa 2015)
Solar Panels
(2,500 ft) ½” Black Poly Tubing → $230
(Qty 6) ½” x 4’ x 8’ Exterior Plywood → $150
(Qty 40) 1” x 2” Exterior Lumber → $80
(2 lb) 1-¼” Exterior Screws → $10
(6) ½” Poly Tubing Couplers → $5
(1 Gal) Black Exterior Paint, Flat → $25
Roof Mounts
(Qty 16) 2” x 4” x 10’ Treated Lumber → $75
(Qty 56) ⅜” x 4-½” Galvanized Lag Screws → $25
(Qty 56) ⅜” Galvanized Washers → $3
(1 lb) 2-1/2” Exterior Screws → $5
(Qty 2) 10 oz Tubes of Roof Cement Tar → $10
Panel Headers
(120 ft) 1.5” Sched 40 PVC Pipe → $60
(Qty 24) 1.5” x 1.5” x ½” PVC Tees, Sched 40 → $50
(Qty 24) ½” male NPT to barb connectors → $10
(Qty 24) ½” stainless steel hose clamps → $15
(Qty 4) 1-1/2” PVC Ball Valve, Sched 40 → $20
(Qty 24) ½” Male NPT nipples, plastic → $10
(1) 10’ Roll of ¾” Galvanized Hanger Strap → $5
(3 Cans) Black Spray Paint, Flat → $15
Misc 1-½” PVC Fittings, Sched 40 →$20
Plumbing between Pump and Panels
(100 ft) 2” PVC Pipe, Sched 40 → $70
(1) 2” 3-Way Diverter Valve → $30
(1) 2” Check Valve (See-Through Cover Recommended) → $45
(2) 2″ PVC Unions → $15
Misc 2” PVC Fittings, Sched 40 → $20
Other
PVC Cement → $3
PVC Primer → $3
Automation (Optional)
Pentair SolarTouch Controller 521632 → $250
Outdoor electrical conduit/wire/connectors → $25
Build the Homemade Solar Panels
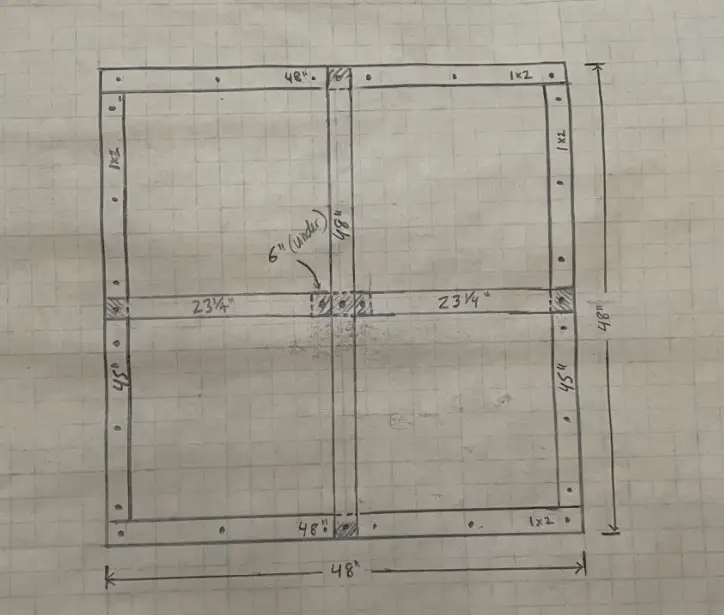
Step 1 – Panel Frame
Here’s a quick cut list for each panel:
- Cut each sheet of 4’ x 8’ plywood in half to form 4’ x 4’ panels
- (1) 6” length of 1 x 2 for each panel
- (3) 48” length of 1 x 2 for each panel
- (2) 45” length of 1 x 2 for each panel
- (2) 23-¼” length of 1 x 2 for each panel
Secure the 6” length of 1 x 2 to the center of the 4 x 4 panel using the 1-¼” screws.
Secure two 48” and two 45” lengths of 1 x 2 around the perimeter of the 4 x 4 panel using the 1-¼” screws.
There should be one 48” and two 23-¼” lengths of 1 x 2 remaining for each panel to be used as the strapping in Step 3.
Paint the front of each panel and the remaining 1 x 2 pieces with the flat black exterior paint.
Step 2 – Panel Coil
The most challenging part of building the panels is trying to wrangle the tubing, especially as it retains the shape in which it was packaged.
I recommend unspooling a long section (50+ feet) and straightening it in order to remove existing bends. Otherwise, you’ll be battling the twists from the package while trying to form your own coil.
You will need to leave enough slack at the ends of the coil to reach the top or bottom edges when connecting to the header.
Starting at the center of the panel, coil the tubing as tightly as possible without kinking it. Try not to leave any gaps between the tubing, keep it tight. There should be a few inches of space between the tubing and the center strip of 1 x 2.
Continue forming a tight spiral within the panel.
You will likely need to pause at certain points to unravel additional tubing from the packaging. If you let go of the tubing, it will likely spiral out of control. TIP: Use a couple of 5-gallon buckets partially filled with water to serve as weights to keep the coil from unraveling in the panel.
If you run out of tubing in the package before a coil is complete, you can use ½” irrigation couplers to easily join another spool of coil together.
Continue forming the coil until there is about 1” distance between the tubing and the perimeter frame. This gap will allow expansion when the coil is full of water.
Cut the coil from remaining tubing, leaving about two feet of excess that can be used to join the coil to the header in later steps.
Place the weighted bucket on the tubing to hold in place, while you complete the next step.
Note: You can also consider a loose coil, which may provide better heating efficiency, but could also require a larger amount of space on the roof.
Step 3 – Panel Straps
We’ll use the remaining lengths of 1 x 2 lumber from Step 1 to create strapping across the panel. This will secure the coiled tubing in place.
Position the 48” length of 1 x 2 lumber across the panel from top to bottom. This 48” piece should sit atop the perimeter framing, and should run perpendicular to the 6” strip in the middle of the panel.
Secure this 48” length of 1 x 2 lumber using three 1-¼” screws: one screw at the bottom frame, one screw at the top of the frame, and one screw at the middle 6” strip.
Position the two 23-¼” lengths of lumber perpendicular to the 48” strap, one on each side. These should sit atop the perimeter framing and the 6” center piece.
Secure the two 23-¼” strips with two screws each: one screw at the perimeter, and one screw at the middle 6” strip.
The coil should now stay in place without need for any weights. The homemade solar panel is now complete!
Repeat this process for the desired quantity of panels.
Mounting Solar Panels to Roof
The steps in this section are for installation onto a shingle roof. Extreme care should be taken when working on the roof, such as use of appropriate fall protection.
Step 1 – Review Truss Support Locations
If you have access to the soffit or attic, you can visually see where the trusses are located. You then determine the spacing between trusses, which is often 16 or 24” on center.
If you are unable to visually verify location of the trusses, you may be able to gently lift a shingle and drill tiny holes until you find the roof joist. Fill in the holes with roofing cement and lay the shingles back down afterwards.
Mark the locations of the joists across the roof with chalk or tape. I would recommend marking at multiple locations running from the peak of the roof down to the eave.
Step 2 – Determine Length of 2 x 4 Supports for Panels
Each of the 4 x 4 panels rests upon three 2 x 4 supports (or four supports if your trusses are 16 o.c.). The supports keeps the panels elevated off the roof to allow for better drainage from rain or snow melt.
For our configuration of panels, we wanted two rows with six panels each. I determined length of the supports by factoring in:
- Two panels – 8 feet combined between two rows
- Two supply headers (1 per row of panels) – 8 inches combined
- Two return headers (1 per row of panels) – 8 inches combined
This meant that I needed at least 9’ 4” for each support. I ended up cutting my supports at 9’ 8”.
Step 3 – Install the 2 x 4 Supports
Now that you have the trusses marked and your supports cut to size, it’s time to install them onto the roof.
Lay out your 2 x 4 supports at each of the truss locations, running parallel with the trusses. Ensure the end of each support is the same distance from either the roof peak or eave, so that they’re straight with each other.
If using ⅜” lag screws pre-drill an 11/64” hole through the 2 x 4 support, through the shingle/sheathing and into the roof joist. For my 9’ 8” supports, I ended up using three lag screws on each: one at both ends, and one in the middle.
The head of the lag screw will need to sit below the surface of the 2 x 4 in order to allow the solar panel to sit flat on the support. To do this you’ll need to drill a countersink hole into the support. The countersink hole should be slightly larger than the head of the lag screw, at a depth of about ½”.
Before installing the lag screw, squeeze the roof sealant down into the shingle pilot hole so that it starts filling into the wood support pilot hole.
Before the sealant dries, install the lag screw and washer using a socket wrench. The sealant should provide a waterproof barrier around the screw and penetration.
Repeat this for the remaining lag screws in each of the supports.
Step 4 – Install Bottom Support Cleats
Before installing the panels onto the supports, it may be easiest to screw a small 5″ block of 2 x 4 at the bottom of each support using the 2-½” screws. These blocks can serve as a cleat to prevent the panels from sliding off the support (and potentially roof) while you are installing them –particularly useful for steeper pitched roofs.
For our configuration, these blocks kept the supply headers elevated above the return headers at a couple of intersections between the pipes.
Step 5 – Mount the Bottom Row of Solar Panels
With the bottom cleats in place, you can start installing the solar panels. Given the bulkiness of the panels, extreme caution should be taken when moving them on the roof.
Position the first panel at the first three supports (or four supports if your trusses are 16 o.c.). Center the edges of the panels on the left and right supports –in other words, there should be about 1-¾” of the supports exposed. This will leave room for the next panel to share the same support as the prior panel.
The panels should be oriented such that one end of the coil is facing downwards and the other end is facing upwards in order to allow for connection to the future header.
Secure the panels onto the supports using the 2-½” screws around the perimeter of the framing. Ensure screws are placed into each of the three or four supports. I used 5 screws on the left and right supports, and 2 screws in the center support.
Repeat this for each of the panels on the bottom row.
Step 6 – Install Upper Support Cleats
After the bottom row of the homemade panels are in place, I measured 5” from the top of each panel onto the support to allow space for the return header. I then installed another set of 5” cleats starting at this 5” mark.
Similar to the first set of cleats installed, these ones will also be used to mount the supply header for the top row of panels.
Install these cleats across all of the supports using the 2-½” screws.
Step 7 – Mount the Top Row of Solar Panels
For the top row of solar panels, you can use the same process as the bottom row. Position the panels at the appropriate locations on the supports and secure them with the 2-½” screws.
Installing the Headers for the Panels
Now that the panels are installed, it’s time to build the headers that will carry water to and from the panels.
As previously indicated, my panels were run in parallel. Since I had two rows of panels, I essentially needed two supply headers and two return headers –one for each row of panels.
Here are the basic steps I used to build the headers. Your steps may vary significantly depending on the arrangement of your panels.
Step 1 – Measure Distances of the Headers
You’ll want to determine where your 2” supply and return piping will be routed onto the roof from the pump. Based on those locations, you can measure the distance to the first panel in each row.
From there, you can measure the overall distance from the 2” supply/returns to the last panels in each row to determine overall length of the headers.
Measure the spacing between each panel to figure out the length of PVC needed between tees. You may have distances other than 4′, particularly if you have gaps between panels to avoid obstacles on the roof, such as vent stacks.
For my installation, I made a quick sketch of my panel arrangement and then marked the distances between the tubing at each of the inlets and each of the outlets. In each row, I had 4’ between each panel except for a 5-½’ distance due to a vent stack.
Overall, each of my headers were approximately 30’ in length.
Step 2 – Cut Piping for the Headers
I assembled my headers as I was on the roof, since it would be difficult to haul a fully assembled 30’ length of pipe up there.
Our headers are simply made of 1-½” PVC, along with 1-½ x 1-½ x ½” tees, ½” nipples, ½” valves, and ½” NPT to barbed adapters that lead to each panel.
You may be able to skip the ½” valves and nipples, as these were included in case we had to take down an individual panel for maintenance. In the 7+ years that we’ve had our panels, we’ve not had any need to actually isolate individual panels using these ½” valves [knock on wood].
Using the dimensions from the prior step, you can cut the respective lengths of PVC pipe that will separate the tees. I used a hacksaw to cut the PVC.
I ended up using a 1-½” valve for each of my supply/return headers –four total. These valves were located immediately as each of the 1-½” headers branched off from the 2” supply/return lines, and had to be factored into the length of PVC pipes.
PVC primer and cement can be used to assemble the pieces.
The headers are capped at the end with a cleanout plug, which is useful for blowing out lines during winterization.
Once the header piping and tees are assembled, you can install the ½” nipples/valves (if desired) along with the ½” NPT hose adapters.
Step 3 – Secure Headers to Supports
As you move along gluing up the PVC and tees, you can start securing them into the wood cleats and supports. I used ¾” galvanized hanger strap along with a couple of 1-¼” screws to keep the headers in place.
I had one spot where the supply and return headers had to cross paths. I installed the supply piping on top of the cleats previously added, which allowed the return piping to pass underneath the supply pipe at the intersection.
Step 3 – Connect the Headers to the Panels
With the headers and panels installed, you can now connect them to each other. Simply slide the poly tubing onto the barbed connector.
Even though the tubing had a snug fit on the barbed connector, I used ½” stainless steel hose clamps as extra security. I didn’t want to risk a loose connection resulting in my pool flowing onto the roof.
Step 4 – Spray Paint the Headers
After installation, we spray painted the top side of the header piping black to increase its ability to absorb the solar energy. This header piping alone provides about 25 square feet of surface area, which is approximately two panel’s worth.
Connecting the Pump Pad to the Solar Panels
At this point, most of the roof work is done with the exception of plumbing the panels to the pump pad. As mentioned, we used 2” PVC piping to go from our pump pad to the roof in order to reduce friction losses.
Although the exact configuration of this 2” piping will be unique to each pool, here are some basic steps we took.
Step 1 – Assess Solar Tie-In at the Pump Pad
Review the equipment pad to determine appropriate tie-in locations of the supply and return piping for the homemade solar heater.
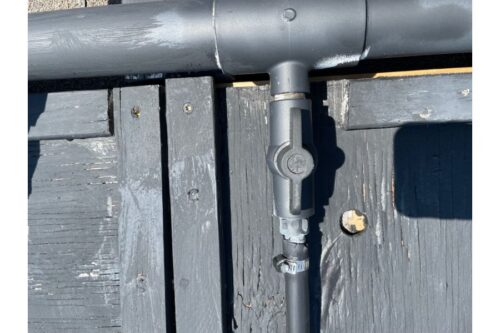
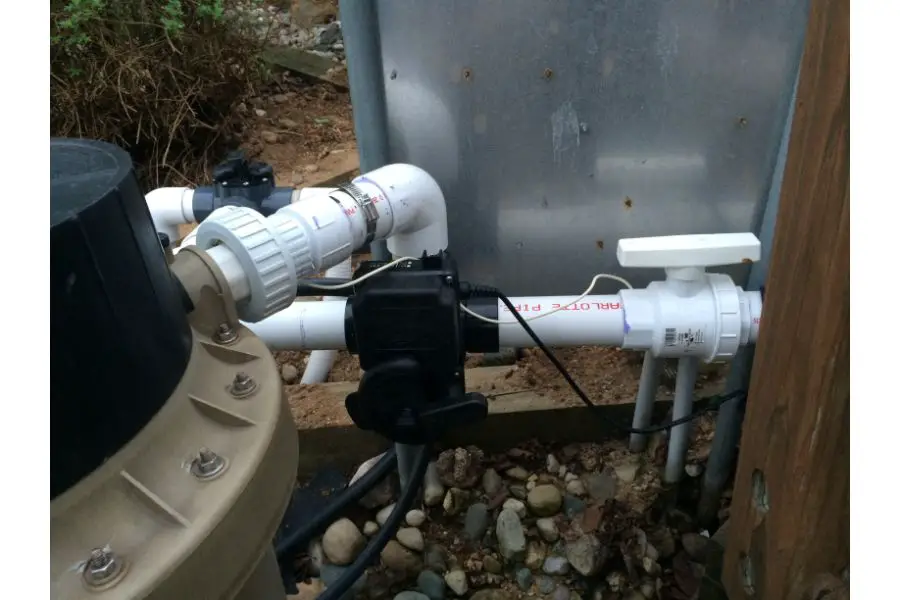
It’s recommended that you tie-in your supply piping after the filter, so that you are providing clean water through the solar panels. A 3-way valve after the filter is commonly used to direct water either to the pool or to the heater.
The return piping from the panels should be tied into the existing return line to the pool. A check valve is often installed on the return line to prevent water from entering the return line when the solar heater is off.
We also installed a 2” union on both the supply and return lines near the pump pad. These unions allow for easy draining of the solar panels during winterization.
We attached our chlorine feeder tubing such that it would bypass the solar panels.
Step 2 – Plan the Path
Since we used rigid PVC piping, it is important to know exactly how you’re going to route the supply and return piping for the panels. Identify any obstacles that may be in the way –e.g., decks, rim joists, etc.
We found that routing the 2” piping underneath the deck would be the path of least resistance in reaching our panels. We had to notch our deck’s rim joist along with a couple of deck boards near the house in order to install the piping.
Also, identify exactly where the piping needs to extend up to the roof in order to meet up with the headers. Hopefully this was roughly determined as you were laying out the headers.
Measure the length of piping runs, and determine angles of fittings needed. The shorter the distance and the less fittings used, will lead to less flow loss –i.e., better pump efficiency.
Each of our supply and return lines required about 30’ of horizontal piping and 20’ of vertical piping, along with about 10 fittings (90s, 45s, couplers, etc).
Step 3 – Install the Piping
Once you’ve laid out your plans, it’s time to install.
Similar to the headers, PVC can be cut to length and glued using the PVC primer and cement. It’s strongly advised to dry fit your components before cementing them together.
We ran our piping starting from the headers at the roof. This ensured that when we cut into the plumbing at our pump pad, we could quickly get our pump back up and running.
Our supply line to the panels consisted primarily of PVC piping/fittings. We installed the 3-way diverter valve and a union valve downstream of the filter.
Our return line from the panels also consisted mainly of PVC piping/fittings, with the exception of a union, check valve, and 2” ball valve.
All in all, the plumbing install was fairly straightforward. There was a bit of trial-and-error with angles coming across the roof’s gutter, but no significant complications.
When hanging the piping down the side of the house or under a deck, plan to use supports/straps every couple of feet. This will help reduce the stress that the weight of the water will put onto the pipes.
Test the System
This is where hopefully all of the hard work has paid off, it’s time to test the homemade solar heater! Here are a few general steps to take:
Step 1 – Check the Solar Heater Before Turning It On
Before sending water to the homemade solar heater, it’s worth double checking all of your connections. Ensure threaded connections and hose clamps are tight.
Also, ensure all of your valves are open –this includes supply/return valves, header valves, panel valves, etc. You don’t want to damage the system because a valve was accidentally left closed.
Step 2 – Review Your Filter Pressure
With the 3-way valve fully open to the pool (solar heater off) and the pump running, check the pressure at the filter. This is your baseline pressure that you can compare against when your solar heater is on.
For reference, the baseline pressure for my DE filter –when clean– is 12 psi.
Step 3 – Run the Solar Heater
With your pump on, slowly position the 3-way solar valve to send water to the panels. Ensure that you rotate the valve in a direction that does not fully close the filter-side of the piping, as this could cause damage.
It may take a couple of minutes, but eventually you should see bubbles coming out of your jets. This indicates that water is pushing air out of your solar heater coils.
Closely monitor your filter pressure to ensure it does not rise too high –most filters can handle up to 50 psi, but check your filter’s specific rating. When initially turning on our solar heater, we often see the pressure initially rises to about 25-30 psi.
Perform a close inspection around all of the plumbing, along with the panels on the roof. Tighten any connections if you see leaks.
Eventually, air should be worked out of the solar panels and the bubbles from the jets should subside. If you installed a check valve with a clear lid, you should see water flowing on the return line from the panels.
Balance the Solar Heater Flow
After you’ve confirmed your homemade solar heater is leak-free and able to supply water to the pool, you should try to find optimal balance at the 3-way solar valve.
While there may be system configurations that require 100% of the water diverted to the solar heater, here are some potential downfalls:
- Turnover rate takes longer due to less return flow
- Too much flow through the solar panels decreases heat absorption
- Filter pressure becomes significantly elevated resulting in shortened lifespan of equipment
For our solar heater, we’ve found it ideal to have the 3-way valve position to where solar is 100% open, but the line to the pool is also 25% open. This allows some water to go directly back to the pool without going to the heater.
Here are some steps I took to balance my solar valve:
Step 1 – Compare Filter Pressure with Solar On and Off
Once the solar heater has been running for several minutes, and after air is worked out of the system, review the filter pressure. Compare it to the baseline pressure with the solar heater off.
It’s normal for the pressure to rise at least several pounds or more. Our heater adds about 8 psi when allowing some water to bypass it based on the position of the 3-way valve.
Knowing your normal pressure with the solar running allows you to easily monitor status of the system down the road.
Step 2 – Compare Return Flow with Solar On and Off
More than likely, when running your solar heater you will have reduced flow back to the pool. It may be noticeable just by placing your hand in front of the jets, as the flow may feel weaker.
This reduced flow can increase the length of time to turn the water over in the pool, and may require you to run the pump longer each day to keep the pool clean.
I used a pool noodle to measure the overall flow back to the pool with various positioning of the 3-way solar valve: 100% open, 0% open, partially open, etc.
Step 3 (Optional) – Measure Solar Heater Flow
While it’s important to achieve proper flow back to the pool and keep the filter pressure at a reasonable level, it’s also important that you’re running enough water through the solar heater. If you have too little flow through the heater, the heater won’t be as efficient in absorbing the sun’s energy.
Many commercial panels have an optimal flow rate specified, often ranging from 3 to 5 gpm.
To measure the flow rate of our panels, I’ve used a couple different methods over the years:
- Bucket Test: Using a 1-gallon bucket, I’ve measured the return flow from individual panels. The length of time it takes to fill the bucket can be calculated into gpm and averaged out across all panels to obtain the total flow rate.
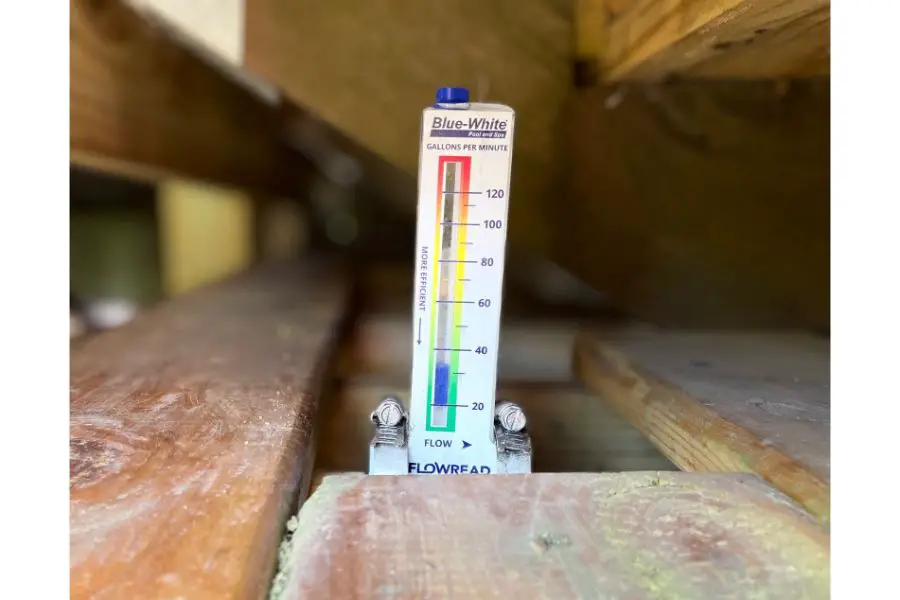
- Flow Meter: I’ve also installed a flow meter on the 2” return line from my panel. This is much easier than using the bucket test and provides instant measurement of the flow rate when adjusting the 3-way valve.
As a reference, our combined flow from all 12 panels is about 32 gpm –so, right around 2.7 gpm per panel. This seems to provide ample heat absorption without significantly compromising the turnover rate of water in the pool.
Step 4 – Adjust the 3-Way Solar Valve
Steps 1 – 3 can be repeated to determine an ideal position of the solar valve. It’s a fine balance between flow to the pool and flow to the heater.
If you’re unable to achieve enough flow through the heater without causing excessive pressure at your filter, you may need to consider a solar booster pump. Unfortunately, a booster pump will add onto your monthly operational costs.
Automate the System (Optional)
Once you’ve become acquainted with your homemade heater, you may see the benefit of adding some automation.
Rather than having to turn the 3-way valve yourself, you can have a solar controller do it for you when the conditions are right. For instance, if the clouds come out and you’re not home, the system can automatically turn off your solar heater.
The solar controller we use monitors the pool temperature and roof temperature. If the roof temperature is warm enough, the controller will open the 3-way valve using an actuator.
The actuator can be set so that it will open your 3-way valve to your ideal positioning previously established.
The controller can be configured with a target temperature, which will prevent overheating the pool. It can also be configured to only turn on the solar heater if the difference between the roof and water temperature exceeds a certain value (e.g., 8° differential).
Some controllers can also turn on a booster pump, if the solar heater requires one.
Installation of the controller is rather simple, but does require electrical knowledge to power it. Consult the controller’s manual for installation details.
Does the Homemade Solar Heater Actually Work?
As fun as it was to design and build the homemade solar heater, it would be somewhat deflating if the heater didn’t actually provide any benefit to the comfort of our pool. So, the big question that most people are interested in before actually building their own solar heater is: Do DIY solar pool heaters work?
As alluded to previously, the performance of solar heaters is dependent on many different factors –amount of sunlight, orientation, pump flow, etc. However, for our heater, we can positively say that it does add heat to our pool.
If we’re in the water swimming while the solar heater is on, we can feel a strong current of warmer water flowing back into the pool through the jets.
Through use of our solar heater, our pool is generally 85 to 90°F during the swim season. Our kids have gotten so accustomed to the warm water that we’ll sometimes hear brief complaints (“it’s cold”) as they hop in the pool if the water has fallen below 85°F.
That’s not to say that our pool will jump 10 degrees in a day because of the solar heater. But, it generally provides at least a couple degrees each day, which can gradually add up over the course of several sunny days.
When we use our heater in conjunction with our homemade solar cover, we’re able to extend our swim season by a month or two with comfortable water temperatures.
Data from Our DIY Solar Heater
While our family has felt the benefit of our homemade solar heater, I always value data to truly measure the performance. Over the course of about three months (May into August), I collected periodic data from our pool and the solar heater to quantify just how well it works.
I purchased a second temperature sensor that is installed on the outlet of my solar heater. This allows me to easily compare both the inlet and outlet temperature simply by switching over a couple of sensor wires in the solar controller.
At over 40 different times across the three-month study, I collected data from the heater while it was “turned on”. Data included various mornings, afternoons and evenings in order to get a broad spectrum of readings.
Here’s a quick summary from the 40 data points:
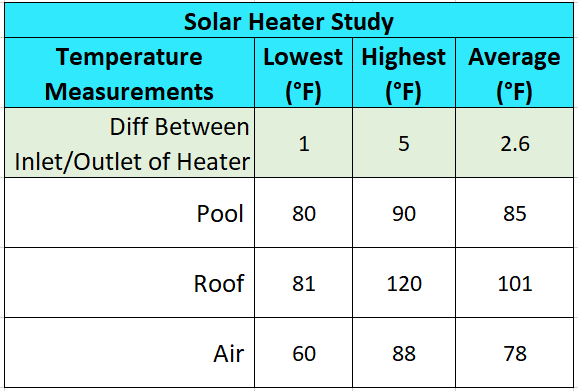
From this data, it can be seen that on average the heater achieved a 2.6°F rise in water temperature between the inlet and outlet of water. Even though outdoor air temperature was typically below the pool temperature, the sun beating on the panels was able to still heat the water!
Our heater normally runs from around 9AM until 5PM, as long as the roof temperature is more than 8°F higher than our pool temperature. We see highest solar gains from 11AM to 3PM, when the sun is most directly over the panels.
During our peak period (11AM to 3PM), the heater provides an average 2.9°F temperature increase between the inlet and outlet of the heater. However, we’ve observed increases of up to 5°F, most commonly when our roof temperature is more than 30°F warmer than the water temperature.
Unsurprisingly, our DIY solar heater is most effective when the difference between roof temperature and water temperature was largest. This is when we’d expect the greatest absorption of solar energy. Here’s a simple summary:

Commercial solar panel manufacturers often market the ability to achieve a 10 to 15°F heat gain over the course of a week or two. While we don’t have the ability to directly compare the performance of our homemade heater against a commercial one, our data indicates the ability to achieve similar temperature gain.
Flow Rate Through the Heater
We typically see a total flow rate of 32 gpm through our solar heater, measured through a flow meter.
When bypassing the heater, our normal flow rate back to the pool is upwards of 40 gpm. This means we see an approximate 20% reduction in flow rate when running the heater.
This reduced flow rate means that we need to run our pump about 10 hours daily instead of 8 hours in order to ensure a turnover of water when the solar heater is active.
If trying to run the pump at a bare minimum of one turnover per day, this extra two hours could cost about $10 extra in electrical cost per month.
How Fast Can the Solar Heater Heat Pool Water?
Based on the data collected from our homemade solar heater, we can determine how quickly it can heat up the water.
We know that our average temperature increase across the heater is 2.6°F and our typical flow rate is 32 gpm. This equates to 41,000 BTU/hr from the solar heater.
Since it takes one BTU to heat up one pound of water by one degree Fahrenheit, we can determine how long our homemade solar heater will take to raise our pool temperature by one degree:
- Our pool is 20,000 gallons. A gallon of water weighs about 8.3 lbs. This calculates to an overall weight of 166,000 lbs.
- Time it takes to heat the pool 1°F = 166,000 lbs divided by 41,000 BTU/hr = about 4 hours.
With our heater typically running about 8 hours each day, this means we’ll often see our pool temperature increase by 2°F or more just from the solar heater. It’s not uncommon to see our pool rise by 6°F or more in a day after also factoring in natural heat gain from the air temperature or sunlight directly onto the pool.
Although the 2°F daily increase of pool temperature from the heater may not sound impressive, over the course of a week it has the potential to add close to 15°F compared to an unheated pool. This is particularly true if you protect your heat gains by using a solar cover on cooler nights.
Just know that while solar heaters are great in providing free heating to your pool, they will not heat anywhere near as quickly as a traditional gas or electric heater. Traditional heaters can raise the pool temperature by about 20°F in 24-hours.
However, if you have patience in heating your pool, a solar heater is a great option that will pay for itself quickly!
Final Takeaway
When considering solar, the most important aspect is to determine whether you have a favorable location where the panels can be installed. As proven through our solar heater, even an east facing system can provide measurable results.
While our journey in creating a homemade solar heater for the pool began with some uncertainty, it has proven to be a great way to help keep our pool warmer. Even with our heater having less surface area than the industry recommended, we’re seeing noticeable gains in temperature that allows us to extend our swim season.
If you want to take the most advantage of a homemade solar heater, don’t forget to use a solar cover on those cool nights. This will help you boost your pool’s temperature in no time!
Happy (cheap & warm) Swimming!
Husband and father of three (actually, four if you include the pool). I’m an avid DIY-er and weekend warrior that enjoys taking up new projects around the house to help us maximize leisure right at home. I enjoy researching and sharing various tips, tricks and knowledge to help others make their home an oasis.