[2023 Update: After success of using this homemade solar cover in 2022, we found some improvements that we’ve detailed here.]
Maintaining a comfortable temperature in the pool is a common goal amongst pool owners.
We have a DIY solar heater that is great in helping boost the temperature of the water –however, preventing heat loss is equally important. It can be disappointing to see hard earned solar gains disappear after a cool night.
Up until this year, our go-to method in retaining heat in our pool had been the use of a traditional bubble cover. The trusty bubble cover is great at reducing evaporation leading to minimal heat loss.
Unfortunately, any bubble cover we’ve ever owned has only ever lasted a couple of years before disintegration starts. Once fragments of plastic start showing up across the pool, it’s time to pitch it to the curb. Our last bubble cover was tossed at the end of the prior pool season.
With the cost of bubble covers not exactly being cheap, we decided it was time to try something different.
We initially started the pool season solely using a liquid solar cover. However, we found that it was no match for our Michigan nights, and decided to explore other options for a cheap pool cover.
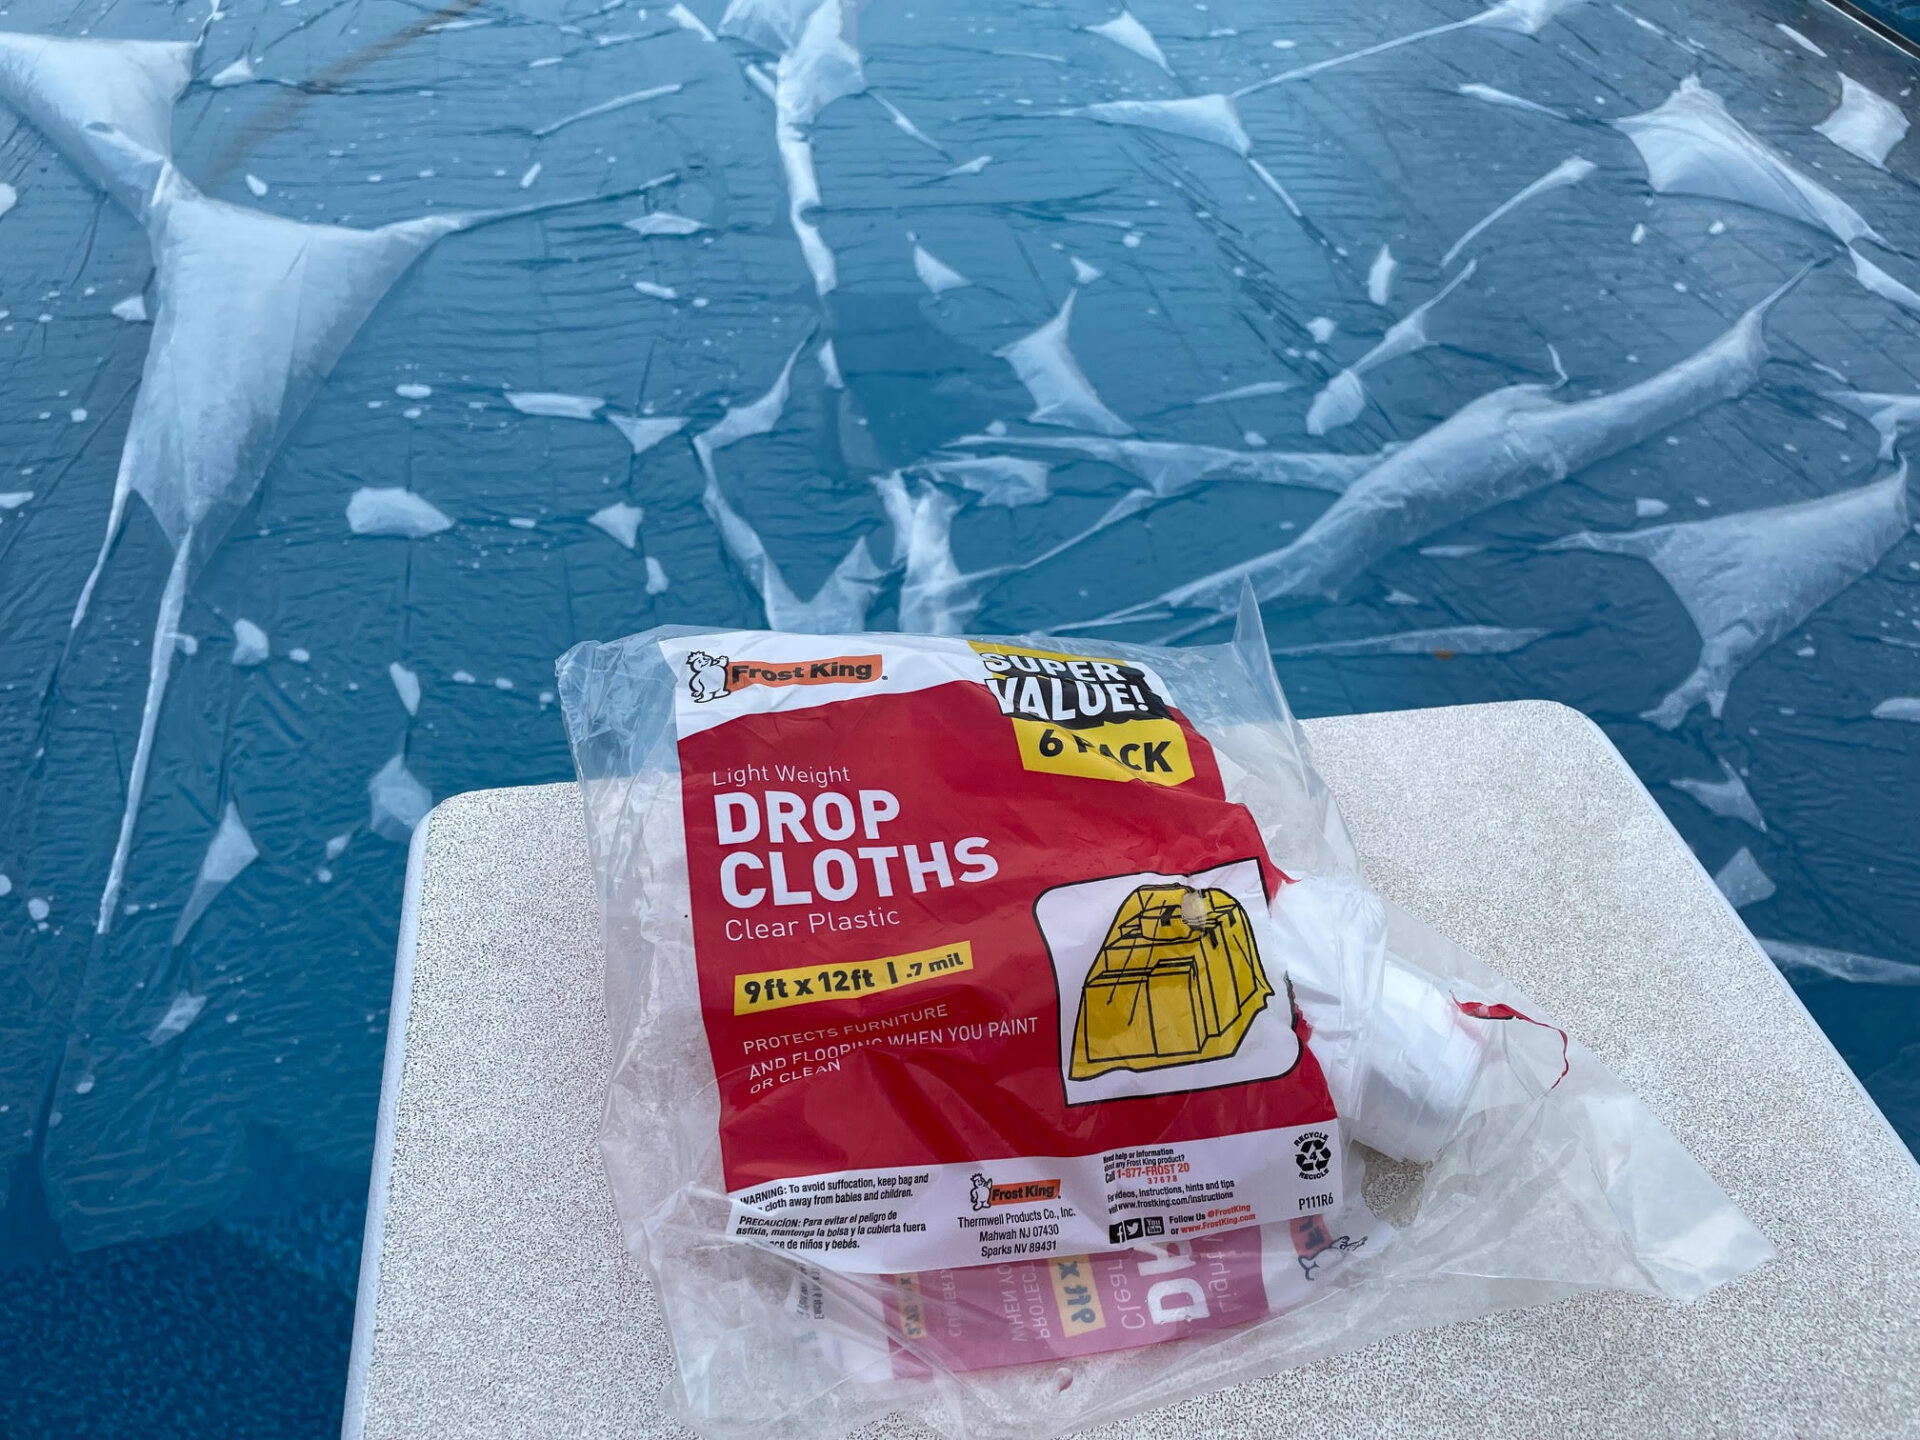
We made a trip to our local hardware store and found a promising option to serve as a homemade solar cover for our pool: Plastic Drop Cloths! Yep, those plastic sheets that are generally used to keep the floor clean while painting.
You may be wondering whether plastic drop cloths can actually be effective as a homemade solar cover. In short: YES!
After using the homemade pool cover, we’ve found it to be nearly 70% more effective than solely using a liquid solar cover. It’s also much cheaper than any other options available at the pool shop!
In this article we’ll show you how you can use drop cloths as a DIY pool cover, along with the pros and cons.
We’ll also perform a more in-depth look at actual temperature data to allow comparison of this homemade pool cover against a liquid solar cover.
Let’s dive in!
Deciding on a Homemade Solar Cover
The ultimate function with any solar cover is to provide a barrier between the pool’s surface and the surrounding air, as this will help prevent evaporation. Aside from traditional pool covers, there are many DIY options available that can fulfill this need –such as tarps, bubble wrap, house wrap, etc.
In searching for materials for our homemade pool cover, we stumbled across an end cap at the home improvement store for plastic drop cloths: A six pack of 9×12 clear plastic drop cloths for the bargain price of $7!
Drop clothes come in various materials, such as fabric, canvas and plastic. They are also offered in different sizes and thicknesses.
Let’s look at some considerations when determining the type of homemade solar cover to use.
Solar Cover Size
To maximize effectiveness, the homemade solar cover should cover as much of the pool’s surface as possible.
Each 9×12 sheet of drop cloth covers 108 square feet, however, there are other sizes available. For reference, a typical 18 x 36’ rectangular pool is 648 sq ft –six rolls of 9×12 cloths would be enough to cover this area.
You’ll want to search for the appropriate quantities and sizes that allow for best coverage of your pool’s surface area.
The higher percentage of surface area covered, the less evaporation (heat loss) you’ll see. Aiming for at least 90% coverage is a great goal. However, even if you’re unable to cover 90% you’ll still see benefit.
If needed, you can trim the solar cover to better fit the contours of your pool –however, this may add complexity when placing the cover onto the pool.
Solar Cover Material
It’s important that the solar cover is made of material that can hold up to the chemicals in pool water along with the sun’s UV rays.
Many plastic drop cloths are made of polyethylene. Polyethylene is the most common plastic in use today.
Polyethylene is also commonly used for many traditional bubble covers, providing confidence that the plastic drop cloths should be OK to withstand contact with the pool water.
The primary difference with the polypropylene in the drop cloth versus a traditional pool cover, is that the drop cloth is likely not be treated for UV-resistance. This means the DIY pool cover may degrade quicker if exposed to the sun.
Choosing a clear material will allow sunlight to shine through and will be more effective in heating the water than an opaque cover.
Solar Cover Thickness
Drop cloths are offered in varying thicknesses, typically ranging from 0.4 mil to 4 mil. To give you an idea of thickness, a standard kitchen garbage bag is 0.9 mil thick and freezer bags are around 1.75 mil thick.
Thinner plastic covers will be lightweight for handling, but may be more difficult to put onto the pool due to the flimsiness. Thinner material may also not provide as much longevity as thicker ones; however, their cheaper price may offset their lifespan.
In comparison, traditional bubble covers generally run from 8 to 16 mil thick.
About Our Homemade Solar Cover
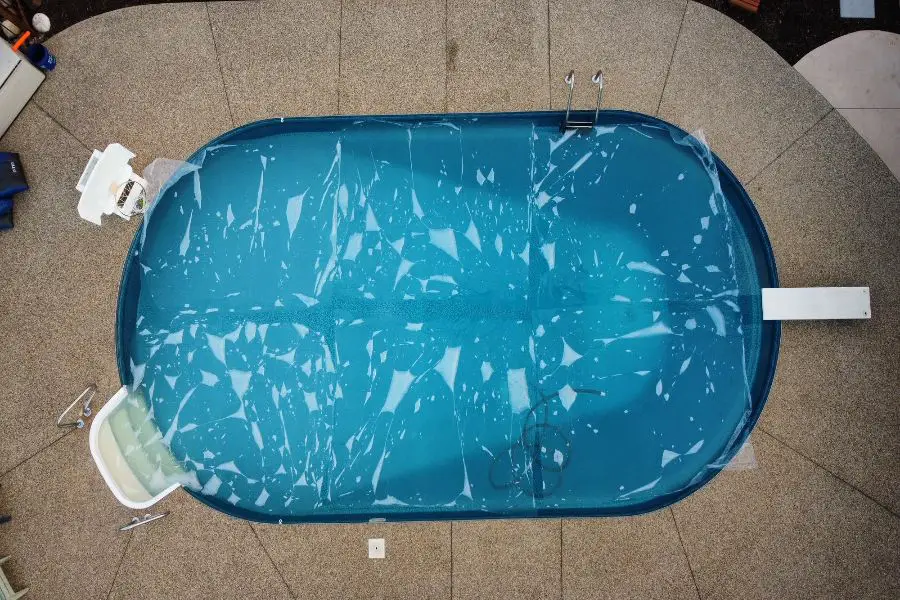
Our in-ground pool is a typical 18 x 36 oval shape, approximately 600 square feet of surface area. The package of six drop clothes provides 648 sq ft, which is more than enough coverage for our pool.
The drop cloths we purchased to serve as our DIY pool cover are 0.7 mil thick, which is only slightly thicker than plastic grocery bags.
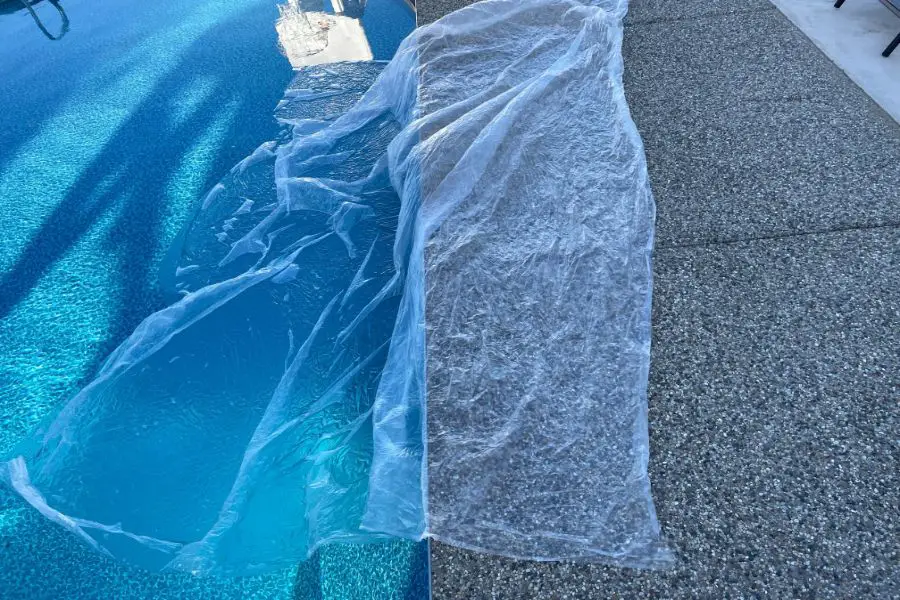
Since the drop cloths are rectangular shaped and our pool is oval shaped, we don’t achieve an exact fit. However, we decided it wasn’t worth the hassle of trimming the material to fit, and just allow some of the corners to remain bunched at the pool perimeter.
While it was tempting to tape the edges of the drop cloths together to form a single large cover, we decided to keep them separate. This means that our homemade solar cover was ready to use right out of the package!
By not taping the sheets together, we do end up with some gaps around the edges, giving us around 90% coverage.
Traditional bubble covers often get a bad rap due to the hassle of placing them onto the pool. Even with a solar reel, bubble covers can be a chore to deal with.
We’re not going to sugar-coat it, the drop cloth cover is probably not going to save you any time laying it on the pool compared to a normal bubble cover. It takes some patience and finesse to place each sheet onto the pool. Fortunately, the homemade cover is very lightweight, so it’s not physically demanding.
Similar to our old bubble cover, we use the homemade pool cover sparingly in large part due to the time it takes to place it onto the pool. We typically only place it onto the pool if overnight temperatures are expected to dip below 60°F. This will vary based on personal preference.
How Well Does the Homemade Solar Cover Work?
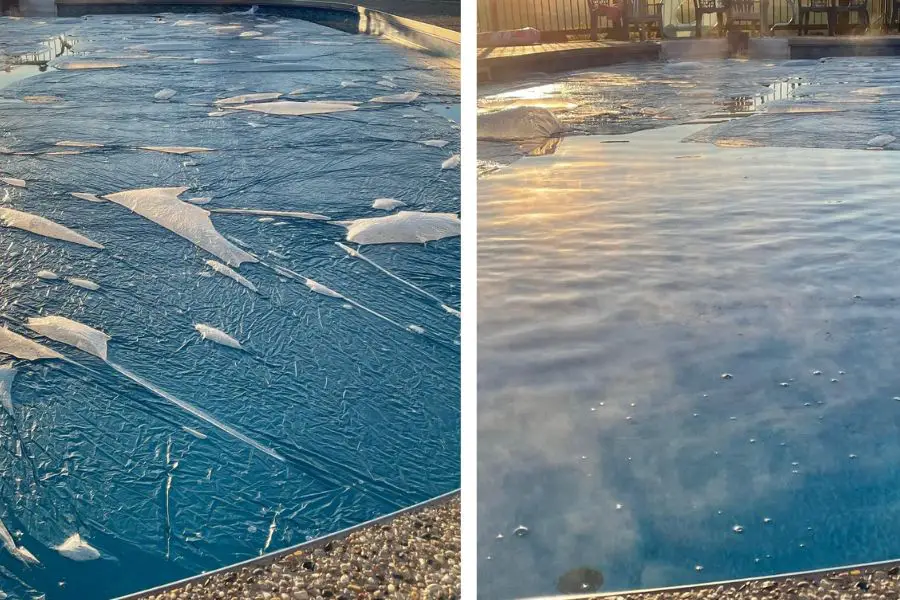
If you’ve ever seen fog rising from your pool in the early morning, this is essentially the heat escaping. The photo above provides a visual comparison of heat loss with cover vs no cover.
When using the cover, we noticed a substantial improvement in retaining heat compared to solely using the liquid solar blanket. Even on cool nights the water temperature doesn’t seem much different in the morning when using the drop cloths.
To help us better quantify our intuition we decided to perform a simple study.
Homemade Solar Cover Study
For this study, the homemade solar cover was placed onto the pool during several nights when cool temperatures were forecasted. It was placed on in the evening, and taken off the following morning.
Here is the basic data we collected during the study:
- Overnight Air Temperature: This signifies the lowest outdoor air temperature that occurred at night.
- Starting Pool Temperature: This signifies the water temperature in the evening as the cover was placed onto the pool.
- End Pool Temperature: This signifies the water temperature in the morning as the cover was removed from the pool.
From the data, we calculated the average difference between the Overnight Air Temperature and the Starting Pool Temperature. The larger the difference between the air and water, the more heat loss we would expect.
We also calculated the average temperature loss overnight based on the Starting and End Pool Temperatures to provide ultimate determination as to effectiveness.
This study did not account for wind or relative humidity, which can also factor into heat loss.
Results of the Homemade Solar Cover Study
Below is the data for the temperature study of the homemade solar cover.
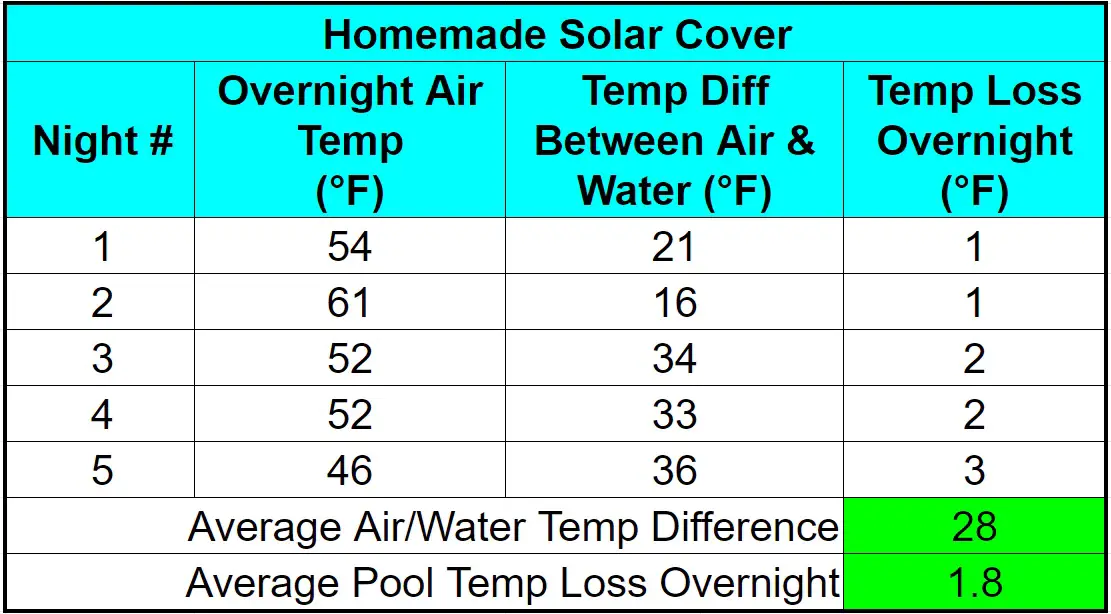
This data shows that the pool temperature only dropped 1.8°F overnight while using the homemade pool cover, even with the outdoor air temperature being 28°F cooler than the water temperature.
To provide a basis for comparison, we also collected similar data with just the liquid pool cover as shown below.
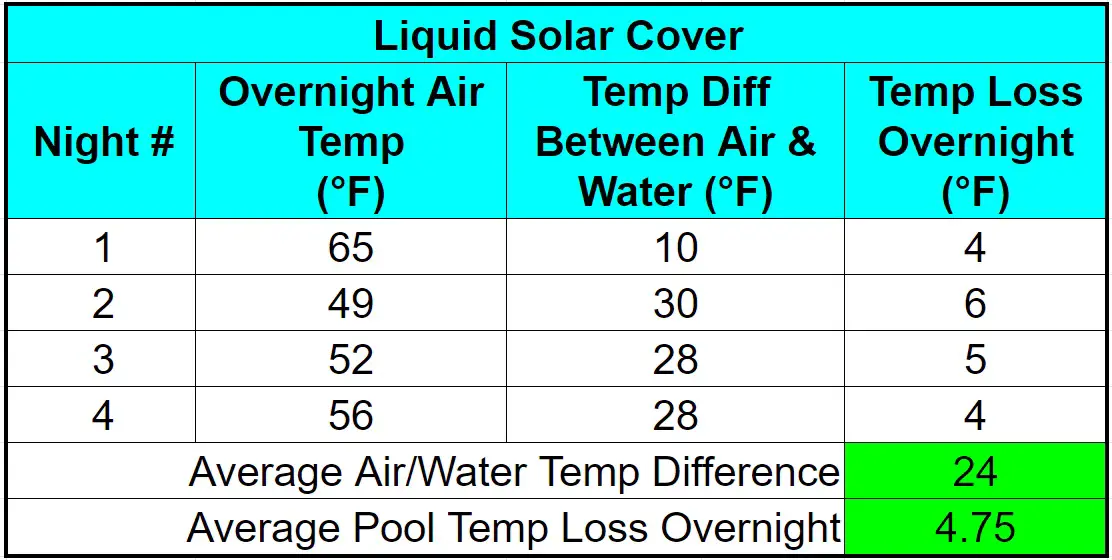
This data shows that we lost 4.75°F overnight while using the liquid solar cover, when the outdoor air temperature was 24°F cooler than the water temperature.
For the liquid solar study, if we adjust the average air/water temperature difference from 24 to 28°F (same difference as the homemade solar cover study), we may have lost more than 5.5°F overnight using just the liquid cover.
This comparison indicates that the $7 homemade pool cover is close to 70% more effective than the liquid pool cover.
Considering we often gain 5°F during the day, it’s easy to see that using the homemade solar blanket allows us to continue gaining temperature even if some cool nights are involved.
How to Use the Homemade Solar Cover
Now that you have an idea as to effectiveness, it’s time to understand how to use the homemade solar cover.
As mentioned earlier, this DIY solar cover has a bit of a learning curve when first using it. But, once you’ve placed it onto the pool a couple times it becomes almost second nature.
Placing the Homemade Cover onto the Pool
We’ve found that it can take upwards of 15 minutes for one person to place all six drop cloths onto the pool when using the 0.7 mil thickness. Here are the general steps:
1 – Eliminate Water Circulation at the Surface of the Pool
Due to the lightweight of the drop cloths, they are very susceptible to being pushed around the pool.
When the homemade cover is on, you may find it best stays in place when the pump is off or at low speed. If using a thicker material, leaving the pump on may not cause an issue.
Alternatively, pointing the pool jets downwards may allow you to keep the cover on without the surface water pushing it around.
2 – Unravel
Fully unravel the plastic sheeting near the edge of the pool. It may be helpful to place a portion of the sheet onto the water.
3 – Lift & Lay
This step may vary based on the thickness of your drop cloth and whether there’s any wind.
In most instances we have a bit of wind to deal with, and find this approach works best:
- Slide the longside’s leading edge of the cover into the water while the backside remains on the pool deck. Try to keep the cover on top of the water rather than submerging it.
- While standing on the backside edge of the cover (on the pool deck), use the brush to push the leading edge further out towards the middle of the pool.
- Continue to push the cover further into the water until there’s no more slack.
- Step off the cover and finish pushing it into the water with the brush.
If it’s a particularly calm day without wind, or if using a thicker drop cloth, we’ve had some success with this approach:
- Grab the long edge of the drop cloth and lift it into the air similar to placing a sheet on the bed.
- Allow the far edge to slowly float down onto the pool’s surface.
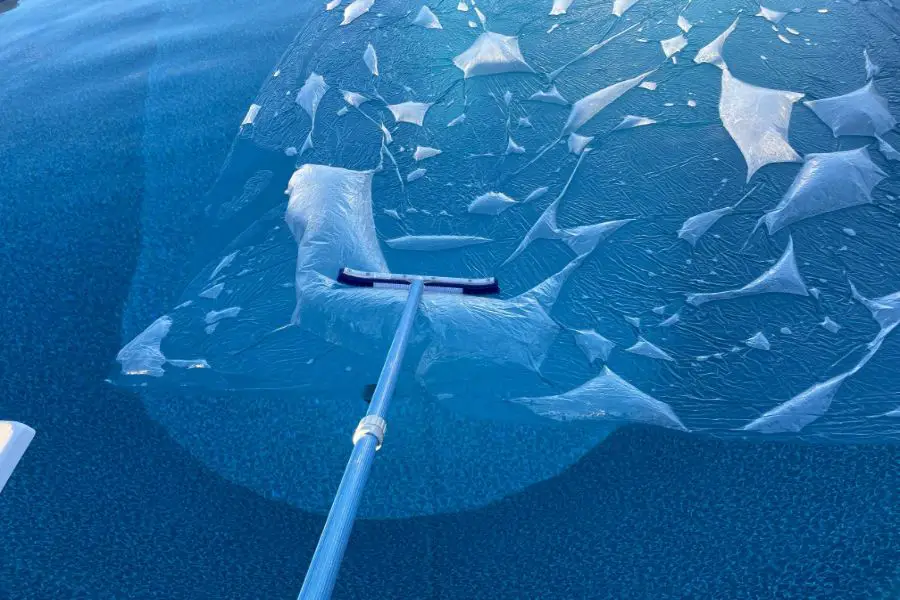
4 – Brush
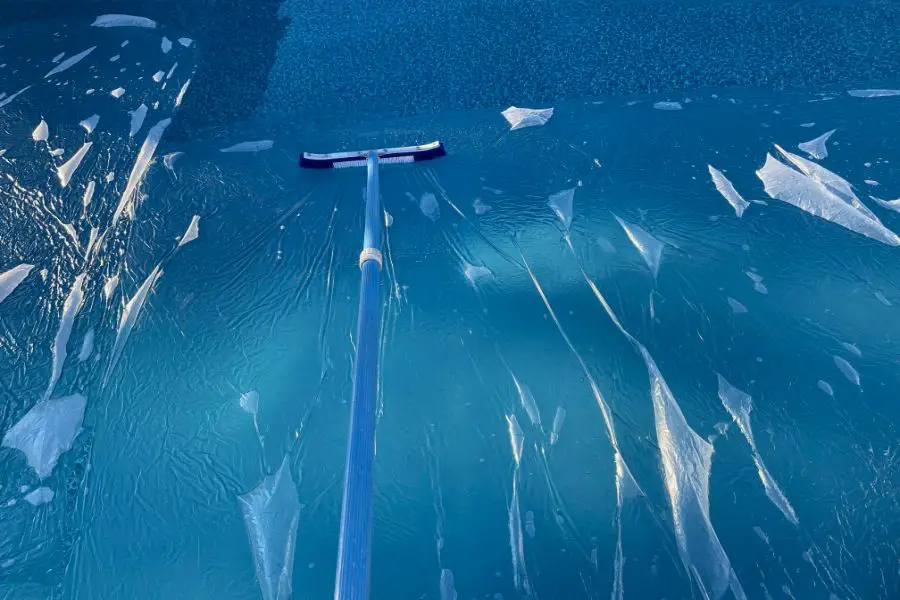
Use the pool brush on the telescopic pole to gently push air bubbles out from under the cover. The brush can also be used to help spread the sheeting flat to reduce wrinkles.
Tip: Go slow and do not push hard or else the brush may get entangled with the plastic causing wrinkles and/or tears.
Removing the Homemade Cover from the Pool
Removing the drop cloths from the pool is a breeze. Here are the simple steps:
1 – Pull the Cover Off the Pool
Lift each of the plastic sheets from the water one-by-one.
2 – Shake the Water from the Cover
Gently shake the water from the cover to speed up the drying process.
3 – Lay the Cover Out to Dry
Find locations around the area to lay out the plastic sheets. The sheets will typically dry in an hour depending on temperature and sun exposure.
Rails around the pool or deck can be useful spots to hang them.
If it’s a breezy day, it may be best to secure a couple corners with a lawn chair or other object to prevent the cover from blowing away.
Tip: If laying them onto a hard surface, such as a cement pool deck, you may want to flip the sheets over after a while so that both sides can dry.
4 – Store the Pool Cover
Once the plastic sheets are dry, you can quickly roll them up. The thinner sheets tend to compress fairly nicely, and are forgiving when unrolling them for later use.
It doesn’t take much space to store the cover. A shaded area protected from the wind –such as a shed or garage– will increase the longevity.
Pros and Cons of the Homemade Solar Cover
As we’ve had a couple months of periodic use from our homemade solar cover, here are some basic pros/cons to further help you decide whether it’s right for you.
Pro #1 – Price
There’s no way around it, using plastic drop cloths provides for a cheap pool cover! We could purchase a couple dozen packages of these compared to the price of a single bubble cover.
While longevity is yet to be determined, we’ve not had any issues in periodic use over the course of the first couple months of the swim season. Even if the drop cloths need replacement two or three times in a pool season, it will likely be cheaper than any other commercial or DIY options.
Thicker drop cloths will cost a bit more than the 0.7 mil ones, but are still likely to be cost effective.
Pro #2 – Effectiveness
While there may not be any formal scientific studies that have used a plastic drop cloth as a solar cover, it does serve the purpose as a vapor barrier for your pool.
This plastic vapor barrier significantly reduces the amount of evaporation, which correlates with the amount of heat retention.
Our home study found that the homemade pool cover is nearly 70% effective at heat retention as a liquid cover. In all likelihood this means that the homemade cover should be able to reduce close to 80% of heat loss compared to no cover at all.
Again, effectiveness will vary based on how much coverage you’re providing to the surface of your pool. Our results are based on about 90% coverage.
Pro #3 – Lightweight for Handling
The entirety of all six drop cloths (0.7 mil) weighs less than a pound. The weight of these won’t put stress on the body when handling them unlike some of the traditional bubble covers.
Even if you decide to go with a thicker drop cloth, the weight will be minimal compared to a traditional bubble cover.
Pro #4 – Easy Storage
After using the homemade solar cover and allowing it to dry, it can be folded or rolled up very compactly. If you have a spare shelf in the shed or garage, it should be able to fit without issue until ready for the next use.
Thicker drop cloths won’t compact as tightly and may require a bit more space than the 0.7 mil ones.
Con #1 – Placing onto Pool
Placing the homemade solar cover onto the pool can be a somewhat tedious process. particularly with the thin 0.7 mil thickness. Where we were previously able to place our traditional bubble cover onto the pool in less than 10 minutes, this homemade pool cover can take up to 15 minutes.
The most challenging part is getting the plastic sheets to lay flat on the water. We commonly deal with the following:
- Wrinkles: If the plastic sheets are not floated onto the water perfectly, you’ll likely end up with wrinkles. While we ignore many of the smaller wrinkles, the larger ones will reduce the amount of coverage each sheet provides. For the large wrinkles we attempt to gently brush them out.
- Air Bubbles: After floating the cover onto the pool, you’ll likely have some air trapped under the plastic. We’ve found that large bubbles in the plastic can act as a sail in the breeze, in which we try to eliminate them with the brush. We generally ignore the small bubbles.
Thicker drop cloths will likely make it easier to place onto the pool due to their higher rigidity, and may reduce some of the issues we’ve experienced.
Con #2 – May Bunch While in Use
While the homemade solar cover’s light weight makes it easy to carry, it can also make it more prone to bunching while in use.
Particularly if using a thin drop cloth –such as the 0.7 mil ones that we have– it’s possible that the cover could be affected by the pool return jets. If the jets are directed towards the surface, it is likely to push the cover towards one side of the pool.
For this reason, we usually only keep the cover on while our single speed pump is off. If you have a variable speed pump, the low setting may not cause as much issue with moving the cover around.
Fortunately, the cover does not seem overly affected by breezy conditions, other than making it a bit more tricky when trying to place the cover on. It’s possible the really gusty winds could push thin covers around the pool.
Con #3 – Safety
Using the homemade solar cover poses a similar safety risk as a standard bubble cover. Entrapment and drowning could occur if a person or animal attempts to walk on the cover while it’s in use.
It is always important to secure all entry points to the pool when not in use, and especially after the cover has been placed on.
Con #4 – Not UV Protected
It’s unlikely that the plastic drop cloths have UV-protection embedded within their polyethylene. This means that they may deteriorate after prolonged sun exposure, quicker than a normal bubble cover.
When not in use, it’s recommended that you store them in a shaded area to keep them protected from the sun.
Fortunately, they’re cheap enough to replace if you see that they do start to break down.
Improving the Homemade Solar Cover
Although we’ve been impressed with the results of our homemade solar cover so far, there’s always room for improvement.
We’ve briefly tested a thicker 2 mil plastic drop cloth to determine if there’s any significant difference in handling. Our initial thoughts are that it tends to be easier to place onto the pool.
The 2 mil cover can be lift and floated with relative ease, and minimal bunching as it lands. It is also easier to spread with the brush than the thinner 0.7 mil cover. We were able to place one sheet in less than two minutes, which could get us closer to the normal time it took us to place the bubble cover onto the pool.
Although the price of the 2 mil cover may be two or three times the cost of the thinner cover, it will still be significantly cheaper than most other options on the market.
Other DIY Solar Cover Options
The plastic drop cloths that we looked at in this article are just one of many types of DIY solar covers for the pool. Again, all you really need is a way to provide a physical barrier between the pool water and the air in order to reduce evaporation (heat loss).
Here are some other DIY options:
1 – Tarps
A solid tarp can serve as a DIY pool cover. Tarps come in numerous sizes, so you’ll likely be able to find a single one that can cover your entire pool.
Tarps will cost more than the plastic drop cloths, but are likely to last longer. They may also be cumbersome to move on and off the pool due to the bulkiness and weight.
2 – Homemade Solar Rings
Solar rings are readily available for purchase and often come in 5’ diameter. However, each one can cost upwards of $30, which can become quite expensive when trying to cover your pool’s surface .
It’s possible to make your own version of the solar ring using PVC pipes, a hula hoop, or even pool noodles as a frame. A bubble cover or other plastic can be affixed to the frame using zip ties or string. Once they’re construction, they can simply be tossed into the pool.
3 – Homemade Bubble Wrap Pool Cover
Bubble wrap can also be used as a DIY solar cover in similar fashion as the plastic drop cloths. If you can’t find bubble wrap in large enough widths, it may require you to tape the edges together to make larger covers.
A bubble wrap cover will need a larger space for storage, and might be somewhat bulky to lug around.
4 – Trash Bags
Trash bags can be used to serve a similar effect as solar rings or lily pads.
You can cut two edges of the trash bag to create a larger surface area. The bag can then simply be placed on top of the water.
Alternatively, you can insert a hula hoop or pool noodle into the bag to form a ring shape.
If using 30-gallon trash bags, you may need to use several dozen in order to cover a standard in-ground pool’s surface. This could be cumbersome when it comes time to place them on or take them off.
Final Takeaway
While using plastic drop cloths as a homemade pool cover may seem odd, they are definitely worth some consideration. This DIY cover has the ability to keep your pool warmer throughout the swim season for only a fraction of the cost as that of a standard cover.
Similar to a traditional bubble cover, this homemade cover does require some patience when placing it onto the pool. Fortunately, it’s not a physically demanding endeavor as the plastic drop cloths are extremely lightweight.
We hope this helps provide you with inspiration to keep your pool warmer while being friendly on your wallet!
Happy (warm & cheap) Swimming!
Husband and father of three (actually, four if you include the pool). I’m an avid DIY-er and weekend warrior that enjoys taking up new projects around the house to help us maximize leisure right at home. I enjoy researching and sharing various tips, tricks and knowledge to help others make their home an oasis.